Documentation
This documentation is a guide to all the features and capabilities of Cyclemeter. It explores the key concepts such as Routes and Activities and use of the Stopwatch, History and Sharing. This documentation is also available at cyclemeter.com/documentation.
Key concepts
- Use Cyclemeter just like a stopwatch. In the Stopwatch view, tap Start when you start or continue a workout, Stop when you need to pause or are finished, Lap when you want to mark an interval and a lap point on the map, and then Done when your workout is complete. Tap Reset when you are ready to start again.
- Lock your iPhone using the side button on your iPhone to turn off the display before putting your iPhone in your pocket or cycling jersey. This conserves battery power and prevents accidental touches. Cyclemeter keeps recording.
- Use Siri for hands-free control. See Siri.
- Cyclemeter keeps all your workout data on your iPhone until you choose to share. A year's worth of data will only consume space on your iPhone equal to the size of a few songs. Items can be deleted or edited by navigating to the Workout Info view in the Calendar, History, Routes, or Activities views, and tapping Edit. We recommend that you enable automatic back up to iCloud to preserve your data if your iPhone is lost or stolen.
- Add data manually. Forget to take your iPhone on your workout? No problem, just go to the Calendar or History view and touch +.
- View and share your workouts online. Cyclemeter can display map, graphs, and all your statistics together on one page, perfect for viewing on a larger screen or sharing with friends and family. See Workout Explorer.
- Create and use routes when you travel along the same path. That way, Cyclemeter will compare workouts along each route. You can also import paths to follow using routes. A route also carries the Navigation you follow, so selecting a route is how you start turn-by-turn guidance. Select your route by tapping the button in the upper left corner of the Stopwatch view. See Routes.
- Choose your activity before starting your workout. Cyclemeter can be used for many activities including cycling, running, walking, and more. Select your activity by tapping the button in the upper right corner of the Stopwatch view, and choose (or create) the activity you want.
- Cyclemeter supports interval training and target alerts. Edit or add activities to manage interval training, and to set targets for performance. Cyclemeter will guide your workout with announcements, and record your statistics. See Activities, intervals, targets, plans.
- Cyclemeter supports training plans. Select a plan from the Activity menu of the Stopwatch and you will be guided through workouts to meet your fitness goals. Use the Plans view to view and edit the included training plans, or create your own.
- Cyclemeter can speak your statistics during your workout. See Announcements.
- Cyclemeter can guide you turn by turn. Plan a path on a map, or import one, and Cyclemeter speaks and displays each turn while it records your workout. See Navigation.
- Stop detection allows you to record only the time you are moving. Stop detection is off by default, and can be turned on in Settings or set to always be on or off when using a particular activity by editing the settings for the activity.
- The settings you change most often are one tap away. Tap the gear button to the right of the Start button in the Stopwatch view to reach the workout settings. See Where settings live.
Routes
Routes organize and compare your performance data. By creating a route and continuing to use it when following the same path, you can see your progress in the Map, Calendar, Graphs, and History views. Cyclemeter rates your performance along a route using these icons:
 Best
Best  Better
  Median
  Worse
Worse  Worst
Worst
To create or rename a route, touch the Route button in the upper left of the Stopwatch view, then press + / Edit. Tap + to add a route, or tap a route name to edit its name or settings.
Select a route before or after your start to associate your path with the route. You can also edit the Workout Info later to change its route.
Simply leave New Route selected when you have no need to group the workout with a route. You will still see those paths in the Calendar and History views, or the Routes view under All.
Each route can override the app-wide leaderboard settings. Best Criteria and Workouts to Include are set for the whole app in Settings, and each route may either follow that App Setting or use its own.
For more information see the Routes view.
Activities, intervals, targets, plans
Choose an activity matching your intended workout. The selected activity guides stop detection algorithms, controls whether intervals should be announced and logged, and whether targets should be monitored and announced to keep your workout on track. The selected activity also controls the energy burn calculation, and how your workouts are summarized.
To select an activity, tap the Activity button in the upper right of the Stopwatch view, and then tap an activity name. To edit, add, or delete an activity, tap the Activity button, then tap + / Edit.
You can also view, edit, add, and delete activities from the Activities view.
Intervals can be based on time, distance, location (ended at a specific latitude and longitude), or be unlimited. Unlimited intervals are ended by tapping the Lap button in the Stopwatch view, or by tapping Stop and then Done.
Cyclemeter includes sample activities with simple intervals. You can edit these existing activities, or create new activities with customized intervals and targets.
Targets allow you to set performance ranges, and to be alerted by text-to-speech alerts or notifications when your performance is out of range. Targets may be set for an entire activity, or for an interval.
An activity can also override app-wide settings. Stop Detection, Indoors, Steps, Distance from Steps, Internet Access, Bike, Shoes, and the distance measure each offer an App Setting choice that follows the Settings view, or an explicit value that takes effect whenever that activity is selected. See How an activity overrides a setting.
Plans allow you to control how often you work out and what activities and interval training programs you will do on which day. Cyclemeter comes with built in plans for preparing to run a 5K, 10K, half marathon, or full marathon, but gives you the flexibility to create a plan to your exact specifications. To start a plan, tap the activity button on the Stopwatch, select a plan, and tap Start.
For more information, see the Activities and Plans views.
Workout Info
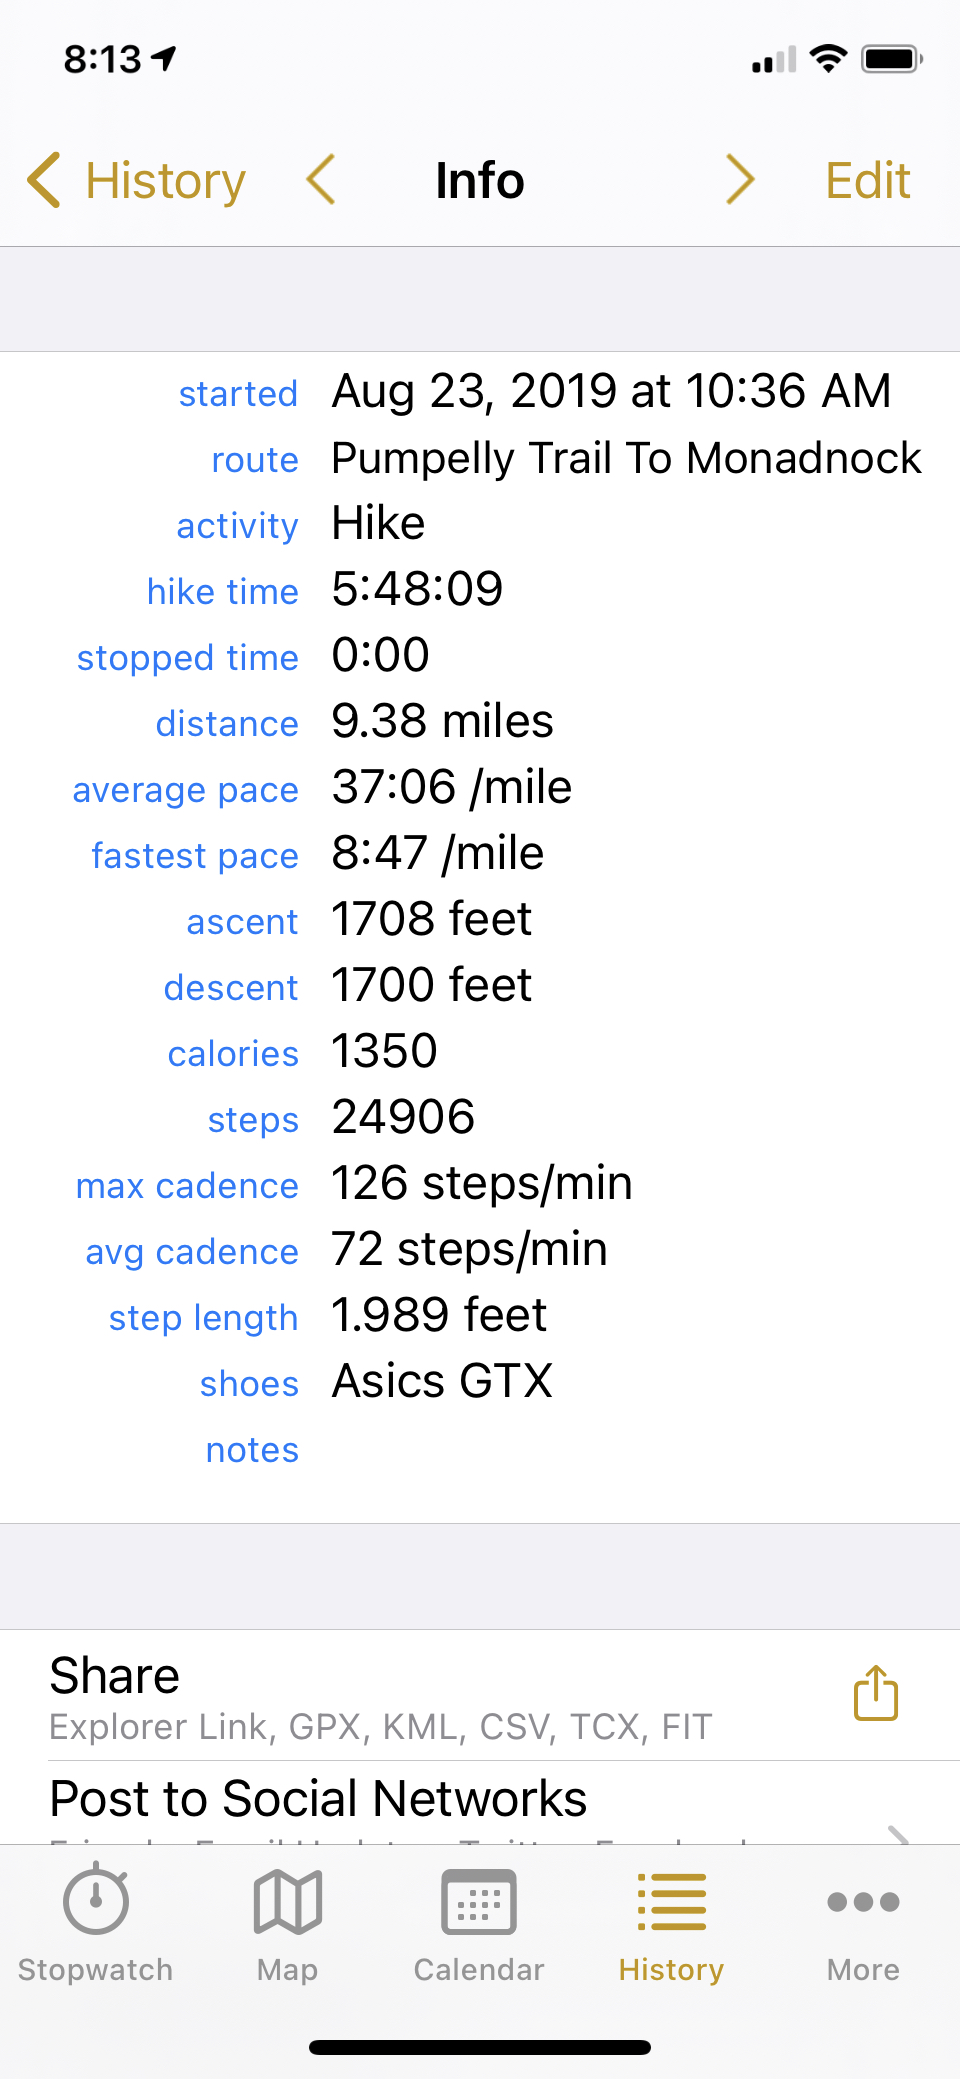
Using Calendar and History views, you can view all the data for your completed workouts. You can also use the Routes and Activities views to see your workouts for each route and activity.
Here you can also see your map, graphs, and weather for the workout. By tapping on the stats, map, or graphs, you can put Cyclemeter into review mode, in which the Stopwatch, Map, and Graphs views all show the data for that workout at the time it was completed.
Share opens the iOS share sheet so you can send the Workout Explorer link, or an export file, to another app.
Email composes an email containing the link and your statistics.
Open In... sends an export to another application to import.
Post posts to the sharing services you have already enabled.
Analyze shows your splits, your intervals (including those triggered by the Lap button), and your zones.
Trim is useful if you forgot to tap Stop at the end of the workout.
Create Route creates a new route from this workout and makes the workout its official path.
Duplicate/Compete duplicates a workout so you can compete against it in future workouts.
Cue Sheet lists the turns and custom cues of the Navigation you followed, in order.
Online Explorer uploads the workout and opens its Workout Explorer on your device.
Calendar Sync sends this workout to your calendar. You can configure this to occur automatically and manage your calendar settings in Calendar settings.
Save to Health sends this workout to iOS Health. You can configure Cyclemeter to do this automatically in Health settings.
Editing a workout
Tap Edit to correct or complete the record of a workout. Most statistics can be changed by hand — start time, distance, time, stopped time, average and fastest speed or pace, ascent, descent, calories, steps, cadence, heart rate, power, temperature, and notes — as can the route, plan, activity, competitor, bike, and shoes. An imported path has no statistics of its own, so editing one offers its name, date, distance, ascent, descent, and notes instead.
Four switches re-derive the workout rather than simply editing a number:
Stop Detection, Indoors, Steps, and Distance from Steps re-run the calculation for the completed workout. This is how you recover a workout recorded with the wrong setting — turn Indoors off, for example, to restore GPS data that was ignored while it was on. Steps and Distance from Steps appear only for activities that record steps.
Reprocess Data recalculates every derived statistic from the recorded samples.
Delete from Health removes the copy of this workout that Cyclemeter saved to iOS Health. It appears only for a workout that was saved to Health, and only while Health is turned on in Health settings.
Delete removes the workout from Cyclemeter.
Sharing
Your workout data is stored on your device until you choose to share. When you share a workout, the data for your workout is made available online, and a URL is provided that you can share. We call this a Workout Explorer.
Workout Explorer
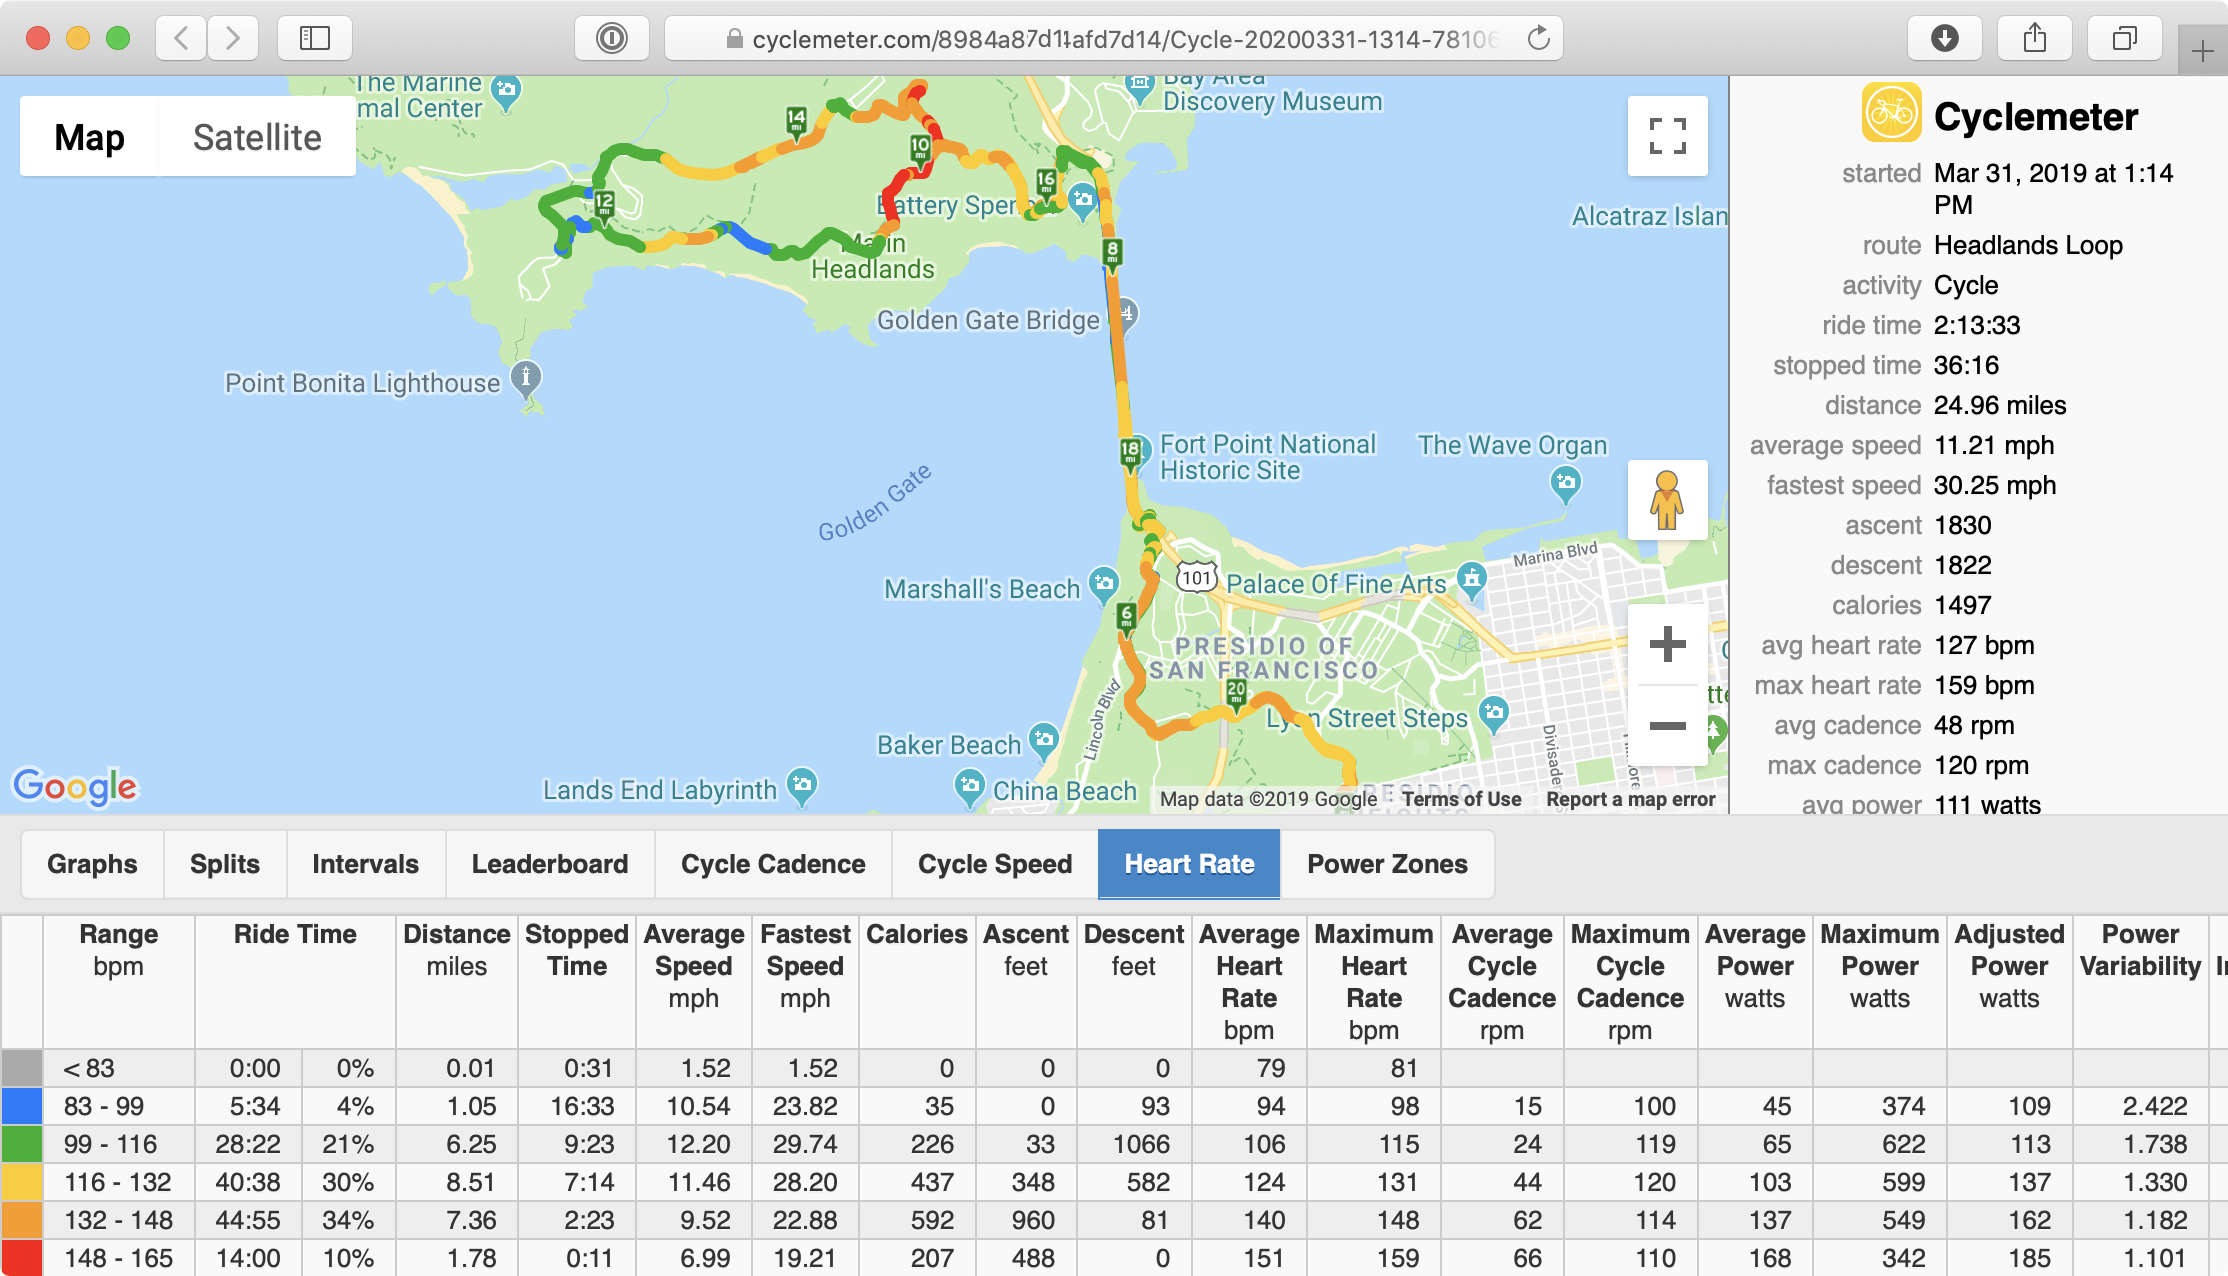
Analyze and share your maps, graphs, and statistics online. Cyclemeter can show all your data conveniently online, including the summary statistics, a leaderboard for the route, and tables for your splits, intervals, and zones. You can focus the graph on particular statistics and control the axes using the buttons below it, or click and drag on the graph itself to zoom.
To share a Workout Explorer manually, open Workout Info and tap Share to bring up the share sheet, Email to compose an email with the URL and your statistics, or Open In... to send an export to another application.
To share a Workout Explorer automatically, see Email Updates. Your workout is automatically shared online by default if you log into any of these services within Cyclemeter. If you do not want to share your Workout Explorer, remove the link from the list of items shared.
To view your workout online from within Cyclemeter, tap Online Explorer on the Workout Info view.
Your Workout Explorer is updated every few minutes during your workout with your current location and statistics. This is a great way to keep friends, family, and coaches apprised of your progress. You and others may view your online workouts on iPhones, iPads, other mobile devices, or computers.
Email updates
You can have a link to a Workout Explorer for your workout automatically emailed to you or to others. This is a great way to view your workout on a computer or tablet, and also a great way to share your workout with friends, family, or coaches. See Email Updates to get set up.
Live tracking and messaging
Cyclemeter supports secure live tracking and messaging with family and friends. Just send an invitation by text or email, and they can install Cyclemeter for free and sign up to receive updates from you. Then, whenever you start or complete a workout, your friends will receive a notification that they can tap to view your workout or send you comments.
During your workout, your friend will see your live location, your path, and your stats within Cyclemeter. They can also enter text messages to send to you, which will be spoken to you during your workout using text-to-speech.
See Friends for info on signing in securely with Apple or Google, and creating invitations.
Automatically post to Strava and MyFitnessPal
Cyclemeter can automatically post to Strava and MyFitnessPal when your workout is done. See Strava and MyFitnessPal.
Sharing with other apps
After a workout is complete, you can view the Workout Info view and tap Share to share the Workout Explorer with other apps.
Navigation
Navigation Overview
Navigation guides you along a path you have planned, while Cyclemeter records your workout. Each turn is spoken as you approach it, and shown on screen — on your iPhone and on the Cyclemeter Bike Computer.
- In the Map view, tap the navigation button
 in the upper left and choose New Navigation. Choose Edit Navigation to change the one you are following.
 - To use a Navigation you created earlier, touch the Route button in the upper left of the Stopwatch view and select its route.
- Start your workout as usual.
- Turns are announced as you approach them, along with any Custom Cues you added.
- Cyclemeter lets you know when you arrive at your destination.
On screen, the next cue appears on the Map view and on the map in the Stopwatch view — its turn direction, the distance to it, the instruction, and any status such as Off course or Rerouting. The Cyclemeter Bike Computer shows the same cue on its own Navigation page.
If you leave the path, Cyclemeter announces Off course and reroutes to bring you back, then announces Back on course when you rejoin. While a reroute is underway, the way back to your path is shown on the map as a red line, which disappears once you are back on course.
Navigation has its own section in Settings, where you can turn Navigation on or off and control its Announcements, Alerts, Jump to Navigation, Rerouting, and Simple Tracking. Alerts and Jump to Navigation are set separately for your iPhone and for the Cyclemeter Bike Computer, so each can behave differently. The Map settings control whether the navigation panel is shown on the map.
Creating a Navigation
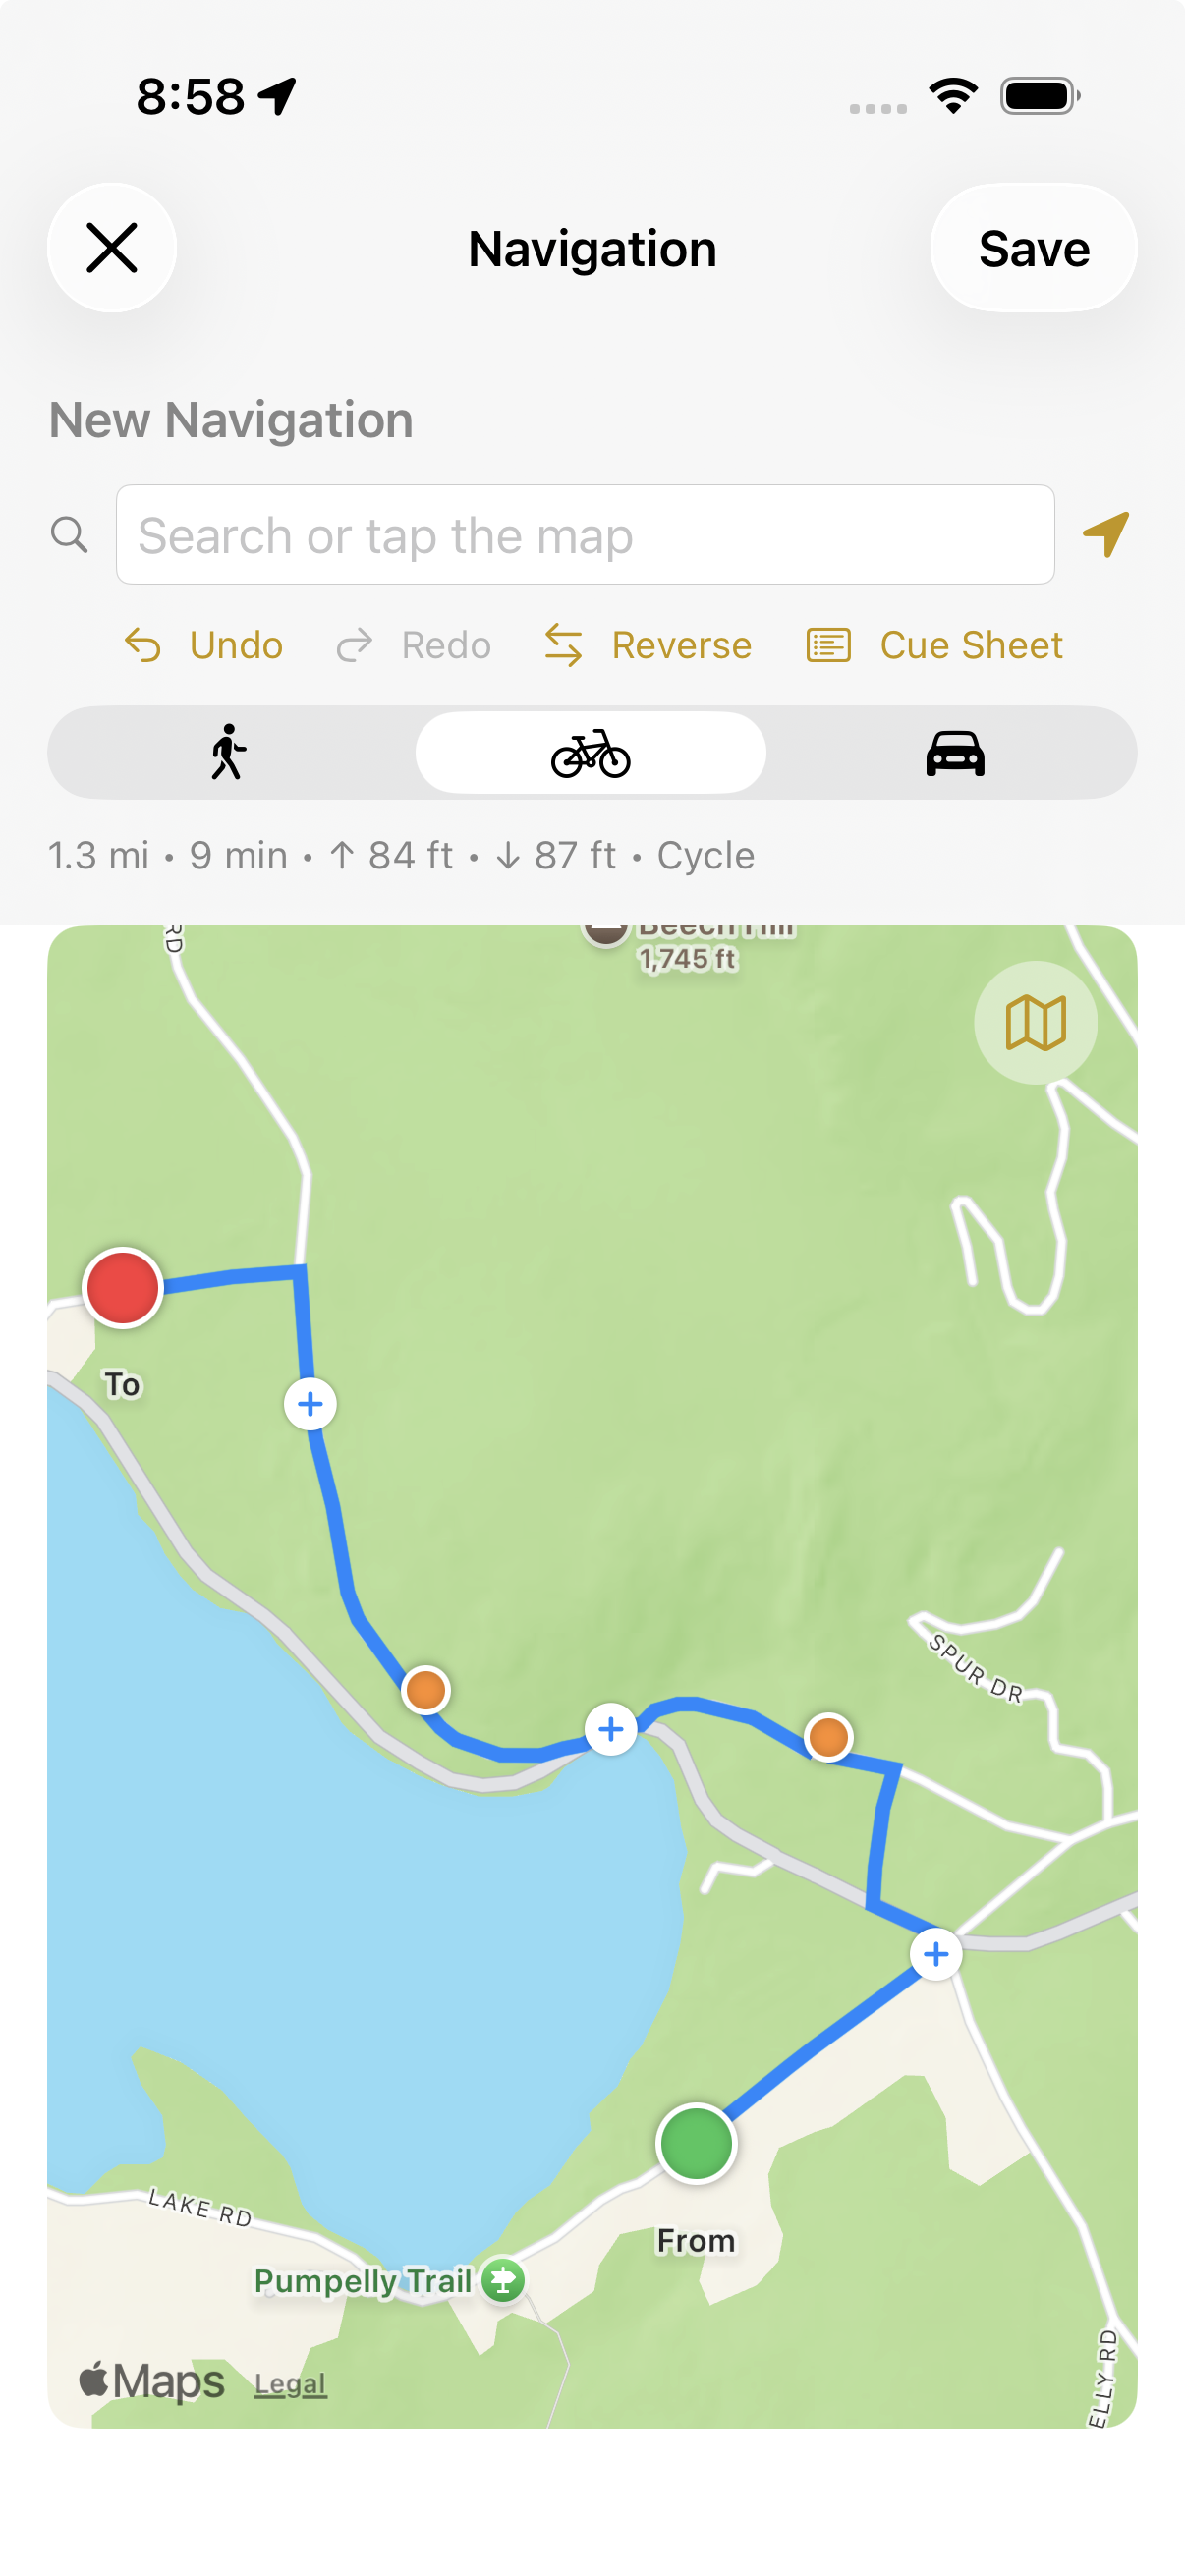
Create a Navigation by dropping points on a map. Cyclemeter finds the roads or paths between them, and saves the result as a Navigation you can follow during a ride, walk, or drive.
See the Navigation view to manage every Navigation you have created. You can open one for editing from three places: the Map view, the Navigation view, and a route's Official Workout / Navigation.
Adding points
You add points in order — the first point is your start, the last is your destination, and anything in between is a guide point along the way. There are three ways to add one:
- Search — type a place or address in the search box, then tap a suggestion (or press Return to take the first result). The point is added to the end.
- Current location — tap the location button in the search bar to add where you are now.
- Tap the map — tap any empty spot to drop a point there.
As you add points, the line is drawn between them and a summary appears — total distance, estimated time, elevation gain and loss, and your travel mode.
Travel mode
The mode selector shows three icons: a walker for walking and running, a bicycle for cycling, and a car for driving. The path recalculates for the mode you choose; driving routes account for current traffic. (Cycling requires iOS 18 or later.)
Adjusting points
- Move a point — drag its pin to a new spot.
- Insert a point in the middle — each leg has a + handle at its midpoint. Tap it to insert a point there, or drag it to drop the new point exactly where you release.
- Tap a pin for its actions:
- Edit — open the point's details (see Cues below).
- Delete — remove the point.
- Close Loop / Open Loop (on the start point) — turn an A-to-B path into a loop that returns to your start, or reopen a loop back into a straight path.
- Undo / Redo — step backward or forward through your point changes.
- Reverse — swap your start and destination, turning the whole route around.
Alternate routes
When Cyclemeter finds other ways to go, they appear as faded gray lines, each with a travel-time badge. Tap a badge (or the faded line) to switch to that alternative. Your choice is remembered for each leg, even as you keep editing.
Custom Cues
Tap a point and choose Edit to turn it into a Custom Cue — a spot that is always announced while you follow the Navigation. For a custom cue you can set:
- Name and Notes — your own text (e.g. "Turn at the red barn"). Notes are what is shown and announced; if you leave Notes empty, the Name is used instead.
- Type — pick from a full list of course-point types (Water, Food, Danger, Summit, Aid Station, and many more), each shown with its icon. Choosing a type alone is enough to create the custom cue; the type's name is announced if you don't add your own text.
Points left as plain "Point" stay silent unless they're a real turn.
Tap Cue Sheet to review every cue in the Navigation in order, each with its icon, its text, and how far it is from the start.
Map options
Use the map-options button to switch between Standard, Hybrid, and Satellite views, and to toggle Traffic and Points of Interest.
Saving and editing
- Save — for a new Navigation you'll be prompted for a name (prefilled as "Start to Destination").
- Editing an existing Navigation — your saved points, cues, and alternate-route choices are all restored, and saving overwrites it in place.
- Cancel — if you have unsaved changes, you'll be asked to confirm before discarding them.
Routes and Navigation
Creating a Navigation also creates a route, so in normal use you never have to connect the two yourself.
A route groups and compares your workouts along the same path, and each route has an Official Workout / Navigation — the path it compares against. When that official path is a Navigation, Cyclemeter runs it during your workout.
- Save a new Navigation and Cyclemeter creates a route with the same name, makes the Navigation that route's official path, and selects the route for you. Just start your workout.
- Use it again later by selecting that route with the Route button in the upper left of the Stopwatch view. Its Navigation runs again.
A Navigation doesn't have to be one you built. A TCX or FIT file that already contains cues — an export from Ride with GPS or cycle.travel, for example — keeps those cues when you import it, and can serve as a route's official path. You get the same spoken and on-screen guidance as a Navigation you created yourself.
When the official path has no cues — an ordinary recorded workout, or a GPX or KML file — there are no turns to announce. Cyclemeter can still tell you when you go Off course and when you are Back on course, using the Simple Tracking settings.
Import / export
Import
Cyclemeter can import GPX, TCX, FIT, and KML files for uses which include:
- Import a file as the official path for a route, so you can see where you are going on the map and elevation graph.
- Import a file as a virtual competitor, so you can compete against the competitor, hear announcements of how far you are ahead or behind, and see their location on the map and graphs.
- Import files of your previously recorded workouts from other social fitness sites and applications, so you can view your workout history in Cyclemeter. Note that only some social fitness sites and applications allow you to export the necessary information.
TCX, FIT, and GPX are the preferred formats for importing workout information. KML import is limited to the KML files created by Cyclemeter.
Imports can be used for navigation. A TCX or FIT file that includes cues — an export from Ride with GPS or cycle.travel, for example — keeps those cues when you import it as a path. Cyclemeter creates a route for it, makes it the route's Official Workout / Navigation, and selects it, so you can follow its directions on your next workout. See Navigation.
How to Import
- On your iPhone, tap the link or mail attachment you want to import in Mail, Safari, or other applications. Tip: You can also use AirDrop to transmit a file from macOS to your iPhone.
- You will be prompted about which application you want to open the file. Choose Cyclemeter.
- Cyclemeter will be launched, and will display a page showing a map and settings. You can accept the defaults, or adjust the following:
Route - Choose an existing route from the list of choices, or tap + / Edit to create a new route.
Activity - Choose an activity from the list of choices, or tap + / Edit to create a new activity.
Competitor - Choose an existing competitor from the list of choices, or tap + / Edit to create a new competitor. Choose the competitor named Me by default to include this workout in your history.
You can also choose whether to import the file as a path or as a workout. 4. Tap Import. The file will be imported, and you will be shown the Workout Info view.
You can also paste a link using Import URL in Settings > Advanced. If timestamps arrive in the wrong time zone, see GPX/TCX Import Uses Local Time Zone and FIT Use Location Record for Start Time in Advanced Settings.
Using Imported Files
Results of your import can be viewed using the History, Calendar, Routes, Activities and Competitors views.
- Tap a route name in the Routes history to see your imports, which will be listed under Leaderboard or Paths.
- A path or any workout can become the Official Workout / Navigation for a route by editing the settings for the route.
- If the import created a competitor workout, it will be replayed as you go along that route. The competitor's icon will be shown on the map and in graphs. You can hear Announcements of your relative progress, and also include this information in posts to Email Updates.
- You may view and manage your competitors and their workouts using the Competitors view.
Finding GPX, FIT, TCX and KML Files To Import
An easy way to find files to import is through other people who use Cyclemeter.
- Every email sent by Cyclemeter includes by default an Import URL link. Just tap the link on your iPhone to start an import.
- Every online Workout Explorer link includes a KML Link.
You can also find TCX, FIT, and GPX files on the Internet to import. Some GPX files contain only location information, in which case they can only be imported as a path. Some may also include timing information, in which case they can be imported as a path or a workout.
Export
Cyclemeter has many ways to export your data.
Exporting a single workout as GPX, KML, TCX, FIT, or CSV
- Tap the History view, or other views.
- Navigate to the workout you want to export. Find it in the list of recent workouts, or drill down through the summaries.
- Tap the workout you want to export.
- Tap Email or Open In.... (Alternatively, tap Analyze to view and export split, interval, and zone information as a CSV file or URL.)
- Choose what you want to share, and whether you want to share as a file attachment, or as a URL to a file on Abvio's site.
- Explorer Link - best for sharing.
- GPX - the most universally-accepted format for sharing location information.
- TCX, FIT - best for sharing with social fitness sites.
- KML - best for viewing in Google Earth.
- CSV - best for analyzing and graphing in a spreadsheet.
- Send the email to yourself or someone else.
Export Summary Data as CSV
- Tap the History view, select summaries, and tap the summary selection you would like to export.
- Tap the Share button to export all the summary data, or tap a summary, and then choose ^ to export a subset of the summary data.
- Choose whether you want to export a CSV file as an attachment, or as a URL to a file stored on cyclemeter.com
- Send the email to yourself or someone else. A CSV file or URL will be sent that includes all of the workouts associated with that route name, or all of your workouts if you chose All.
Export all your workouts
Use Export Workouts in Settings > Advanced. Set a Start Date and End Date to limit the export to a time span, choose a File Format — GPX, TCX, FIT, KML, or CSV — and tap Export Workouts.
Three settings in Advanced Settings shape what your export files contain: Stop Detection in Exports, Export Laps, and Lap on Stop.
Siri
With Siri, you can control Cyclemeter and request particular statistics.
To use Cyclemeter with Siri, first invoke Siri. This might be a long press on a wired Earphone with Remote, or by saying "Hey Siri" with an Airpod, followed by your command.
Here are examples of how you can control Cyclemeter with Siri:
- "Hey Siri, Ask Cyclemeter to Start"
- "Hey Siri, Ask Cyclemeter to Lap"
- "Hey Siri, Ask Cyclemeter to Stop"
- "Hey Siri, Ask Cyclemeter to Done"
- "Hey Siri, Ask Cyclemeter to Reset"
- "Hey Siri, Ask Cyclemeter to Discard"
- "Hey Siri, Ask Cyclemeter to Announce"
Each of these also works in the form "Hey Siri, Start Workout With Cyclemeter."
Here are examples of how you can ask Cyclemeter for statistics with Siri:
- "Hey Siri, Ask Cyclemeter for Distance"
- "Hey Siri, Ask Cyclemeter for Speed"
- "Hey Siri, Ask Cyclemeter for Pace"
- "Hey Siri, Ask Cyclemeter for Heart Rate"
- "Hey Siri, Ask Cyclemeter for Power"
- "Hey Siri, Ask Cyclemeter for Grade"
- "Hey Siri, Ask Cyclemeter for Ride Time"
- "Hey Siri, Ask Cyclemeter for Stopped Time"
- ... and similarly for just about all statistics, including averages and maximums, ascent and descent, steps and cadence, calories, temperature and humidity, and remaining distance and time.
If Siri is confused as to which statistic you request, you will be prompted on screen to choose from a list of statistics.
You can also use the Shortcuts apps to include Siri commands for Cyclemeter for your personal automation tasks. Note that any Shortcuts created prior to version 12.1.50 must be deleted and recreated.
Wind and road noise can prevent Siri from hearing you, so Siri works best with Cyclemeter when stopped or moving at slow speeds.
Views
The first views appear on the tab bar; the rest are reached through More. Use Rearrange Tabs in Settings to choose which views appear on the tab bar and in what order.
 Stopwatch
The Stopwatch view is the primary view in Cyclemeter. Swipe left and right to see more pages with additional statistics, maps, and graphs.
Touch Start or Stop as you would with a stopwatch to start, pause, continue, and stop. Press Done when you are completely finished, and the data will be recorded in the Calendar, History, and other views. Touch Lap to manually record an interval, which summarizes data since the last interval and leaves a pin at your current location on a map. Touch Reset to get Cyclemeter ready to start again.
The button in the upper left selects the route — and with it any Navigation attached to that route. The button in the upper right selects the activity or a training plan. The gear button to the right of Start opens the workout settings, the short list of settings most useful before and during a workout. See Where settings live.
Below the buttons, the GPS indicator shows the quality of your location fix, and the status icons show which sensors, services, and settings are active. Choose which icons appear with Status Icons in Stopwatch settings.
Stopwatch pages are completely configurable. See Stopwatch settings to configure your Stopwatch pages.
 Map
Map
The Map view shows your current path as a blue line. If you are following a route, it also shows the official path as a purple line, and icons for the best, median, worst, and competitors for that route. If Navigation is rerouting you, the way back to your path is shown as a red line.
Tap the navigation button in the upper left to create or edit a Navigation. While you follow one, the next cue is shown here.
 Zoom into your current location.
 Align your view with your heading.
 Zoom to see your whole route.
 Manually zoom and pan.
Pinch to zoom in and out, and double-tap to zoom in.
See Map settings to choose the map vendor and style, and to control markers, cues, rotation, and path drawing.
 Calendar
The Calendar view shows your data by day of month, including icons for best, median, and worst. Touch + to add data for the selected day.
See Calendar settings for more information about sharing the Cyclemeter Calendar with your iPhone Calendar.
 History
The History view gives you many ways to view, analyze, and manage your workouts.
Touch ^ to add, edit, and share workouts, or to import workouts from iOS Health.
The following views are available.
 The list of all your workouts
 Your workouts summarized by time period and activity.
 Your workouts displayed in configurable graphic dashboards.
 Your workouts displayed in configurable graphic dashboards that you configure to be your key performance indicators.
Each dashboard item has its own settings: its title, its type, the statistic it reports, how it is grouped and sorted, the date range it covers, and which routes, activities, plans, bikes, and shoes it includes. Reset Dashboards in Advanced Settings restores every dashboard to its original layout.
 Elite
Elite
Cyclemeter Elite is the subscription that turns on all the advanced features of Cyclemeter. Without Elite, Cyclemeter is supported by advertising, and is limited to basic recording functionality. With Elite, advertising is never shown, and all of the powerful features are made available. Thank you for supporting our development and support efforts!
Manage or restore your subscription with Manage Subscription and Restore Purchases in Advanced Settings.
 Settings
With great power comes a great number of settings! See Settings for the complete list, and Where settings live for the other places a setting can be changed.
 Help
Help
Cyclemeter documentation may also be viewed online at cyclemeter.com/documentation/.This documentation can also be read inside Cyclemeter, in the Help view — on the tab bar, or under More.
 Friends
Our live tracking and messaging capability is called Friends. With Friends, your friends and family can receive notifications when you start and complete workouts, live track your workouts, and can share messages that are spoken during your workouts using text-to-speech technology.
The Friends view has three tabs at the top.
Invite allows you to invite your friends by a text message, by email, or by sharing a unique link.
Workouts shows your recent workouts, limited to the previous five. Tap on each workout to see a map with a path, statistics, and comments. Tap on the map to see a larger and zoomable view, along with more statistics.
Friends shows the people who accepted your invitation. Tap on each of them to see their workouts, or to revoke the relationship.
Maps, stats, and comments are updated about once a minute.
See Friends settings for what you share and how comments reach you.
 Graphs
The Graphs view will show your pace, elevation, heart rate, or cycling cadence. Your current workout is shown as a solid blue line, while a dotted purple line graphs the Official workout on that Route. Use the Settings button (in the top right) to modify which graphs are displayed. See Graphs settings.
 Pedometer
The Pedometer view shows you a bar chart of all your steps by day, week, month, or year. Your steps are measured by the accelerometer in your iPhone. Your total steps are measured in green, and your steps during your foot-based workouts like running and exercise walking are shown in red.
Step counting is controlled by Steps in Settings.
 iCloud
Cyclemeter can save your database to iCloud, backing up your data and allowing you to easily transfer it across devices.
Save Now saves a copy immediately, replacing the copy for this device. Save with Timestamp keeps a dated copy alongside it.
Auto Save controls how often the app automatically backs up your data. Cellular allows backups over the cellular data network; leave it off to back up only over Wi-Fi.
Tap a saved database to install or delete it.
We recommend that you enable iCloud backups. Your backup will be saved after every workout, and if your iPhone is lost or broken, you can easily restore your data to another device.
 Bike Computer
Connect and control the settings for the Cyclemeter Bike Computer, as well as its predecessor, the Cyclemeter Bike Display.
Once a device is connected, this view configures its Pages — and, on the Cyclemeter Bike Display, what its Buttons do.
Settings for the Cyclemeter Bike Computer covers backlight Brightness, Boost Brightness, and Boost Duration, the device's own Zone Colors, and its Navigation settings — including its own Alerts and Jump to Navigation, which are set separately from your iPhone's. On the Cyclemeter Bike Display, Settings holds the Navigation settings alone.
Learn about or purchase the Cyclemeter Bike Computer
 Apple Watch
The Apple Watch view is where you configure the pages you see on Apple Watch, along with related settings.
Import from Health transfers workouts from iOS Health to Cyclemeter, in cases where the workouts were not recorded by Cyclemeter.
Pages configures the swipeable pages and the transitory pages — the glance page and the notification pages for time, distance, split end, interval end, and bike radar. Page Press makes the whole watch face trigger a start, stop, lap, or announcement.
Notifications configures which notifications appear on the watch.
Heart Rate Monitor Settings chooses which device records your heart rate. See Heart Rate Monitor.
Start Opens Watch App controls whether the Apple Watch app is opened when the Start button is tapped on the iPhone app.
Zone Colors controls whether watch statistics are colored by zone, and which zones are used. See Zone Colors.
Crown & Button Press controls what action occurs if both the digital crown and side button are pressed simultaneously on the Apple Watch.
Watch Diagnostics reports the state of the watch connection. Use it when our support team asks for it.
 Devices
Cyclemeter supports Bluetooth wireless technology for connecting to external devices such as heart rate monitors, speed and cadence sensors, power meters, and bike radar.
Tap Add Device to scan for nearby devices, then tap the one you want to add. Tap any device already in the list to configure it.
Each device has its own settings: its Name, and a switch for each kind of data it can supply — Heart Rate, Bike Speed, Bike Cadence, and Bike Power. Power meters add Power Contribution (whether the meter reports one leg or both) and Power Scale, and can be calibrated with Calibrate. Bike radars add a Bike Radar switch. Delete removes the device.
Heart Rate Monitor Settings chooses which device records your heart rate. See Heart Rate Monitor.
See the list of supported devices.
 Plans
Plans
Cyclemeter can help you plan your training as you prepare for a specific goal, like running a 5K or a marathon. Training plans let you control how often you'll work out and what activities and interval training programs you'll do on which day. Cyclemeter comes with built in plans for preparing to run a 5K, 10K, half marathon, or full marathon, but gives you the flexibility to create a plan to your exact specifications.
To start a plan, tap the Activity button on the Stopwatch, select a plan, and press Start. A Plan page will be created to help you track your progress. After your workout is complete, press Stop and then Done, and the workout will be marked as done and the plan will advance to the next workout. You can swipe up or down, or use the buttons on the right-hand side, to look ahead to future workouts, or tap the body of the current workout to edit it or mark it done or not done.
The Plans view lets you manage multi-day training plans. Use + / Edit to add, remove, and reorder plans, or select a plan to view and edit its details.
Individual plans are organized by week. Tap Settings to edit the plan's Name and Description, to set its Start date or day of the week, and to control whether the plan is Synced with Calendar.
Tap any empty day to add an activity. To edit an existing activity, tap its blue button. Tap the entry itself to copy the activity to the clipboard, clear the day, or move the activities within the week. Once you have copied an activity to the clipboard, you can tap any other day to paste it there.
At the end of each week there is an extra row providing the option to duplicate or delete that week, or add a blank week after it. Tip: Duplicating a week can save time when building a plan with a similar structure from week to week.
 Routes
The Routes view shows and manages your routes and history. Tap + / Edit to add or delete a route, or tap a route to change its name and settings, or to view its History and Leaderboard. The All item contains all of your data ordered by date.
Route Settings
The following settings may be changed for each route:
Name is the name of the route.
Best, Median, Worst - If on, shows your best, median, and worst workouts for the route, and competes against them when recording.
Best Criteria selects the statistic used to rank the route's workouts — fastest average speed or pace, shortest or longest time, greatest distance, ascent, calories, average heart rate, average cycling cadence, average power, power output, steps, or average step cadence. Leave it on App Setting to follow Settings.
Workouts to Include chooses whether the ranking considers All of the route's workouts or only the Most Recent ones, in which case a count is set. Leave it on App Setting to follow Settings.
Official Workout / Navigation - If on, the route's official path will appear on the map and graph, and any cues it contains are used for Navigation. Choose the workout, path, or Navigation to use, or None.
Official Distance and Official Time set values used when calculating Remaining Distance and Remaining Time in the Stopwatch, and also for Announcements and Email Updates. Change these settings to non-zero values to set distance and time goals for the route.
On Done Use Official Distance - If on, when Done is pressed on the Stopwatch, the official distance will be used instead of the recorded distance.
Competitors - If on, competes against your competitors for the route when recording.
Icons on Map - If on, best, median, worst, and competitor icons will appear on the map.
Icons on Graphs - If on, best, median, worst, and competitor icons will appear on the graph.
When no route is selected — that is, when New Route is selected in the Stopwatch — the equivalent Official Distance and Official Time are set in Settings.
See Routes for an overview.
Navigation
The Navigation view lists every Navigation you have created. Tap one to edit it, or tap + / Edit to add a Navigation or delete an existing one. See Navigation for an overview.
 Activities
The Activities view shows and manages your activities, as well as intervals and targets. Tap an activity to change its name and settings, or to view its history. Tap + / Edit to add or delete an activity. See Activities, Intervals, Targets for an overview.
Activity Features and Settings
History shows all of the workouts that use that particular activity.
Targets set your desired performance ranges for the entire activity. If your performance is out of range, a target alert will be announced.
The following may be found under Settings.
Name is the name for the activity.
Notes are displayed when an activity is used in a Plan.
Done appears when the activity belongs to a training plan, and marks that plan workout done or not done.
Bike designates which bike will be selected when this activity is selected. Leave it on App Setting to use the bike chosen in Settings.
Shoes designates which shoes will be selected when this activity is selected. Leave it on App Setting to use the shoes chosen in Settings.
Type sets the particular characteristics of the activity, and drives the energy burn calculation.
Summarizes Into sets how the activity is summarized. For example, an activity with intervals can be set to summarize into another activity, so that overall distance and other statistics can be calculated.
Split Distance sets at what distance workouts are segmented into splits.
Stop Detection and Indoors override the app-wide settings whenever this activity is selected. Choose App Setting to follow Settings.
Steps, Distance from Steps, Step Measure, and Step Length override the app-wide step settings. Cyclemeter's indoor activities set Distance from Steps here so that treadmill workouts measure distance without GPS. See Steps.
Speed / Pace indicates whether the activity should show speed (distance / time) or pace (time / distance).
Distance In sets what measure should be used for distance. By using App Setting, the overall application setting applies. See Distance.
Internet Access overrides the app-wide setting whenever this activity is selected. See Internet Access.
Summaries indicates whether this item is included in the reports that are shown in the summary views of History.
Filter GPS Errors sets whether GPS filtering should be done while this activity is in use.
Dampen Fastest Speed / Pace causes the fastest speed or pace to be calculated based on a longer time period, which reduces errors due to GPS inaccuracy.
Show Progress Page adds a progress page to the Stopwatch when this activity has intervals.
Stop at End of Intervals stops the Stopwatch automatically when the last interval finishes.
Physical Activity marks the activity as exercise, which affects how steps are attributed in the Pedometer view.
Location Activity tells iOS what kind of motion to expect, which helps it filter location data. Leave it on the default unless our support team advises otherwise.
Strava Activity and Strava Sport set how workouts with this activity are labeled when posted to Strava.
Layout indicates what items should be shown in the Workout Info view for workouts with this activity, including whether Weather is shown.
References lists the routes, plans, and workouts that use this activity.
Interval Settings
Tap Edit to add and delete intervals for that activity. The following applies for each interval.
Choose Distance, Time, Location, or Unlimited to indicate the interval type.
Name is the name for the interval.
Targets set your desired performance ranges for this interval. If your performance is out of range, a target alert will be announced.
See Activities for an overview.
 Zones
Zones
The Zones view shows and manages zones, which are used to report on your performance by segmenting your statistics, and to color your statistics, graphs, and map.
Zone sets are provided for heart rate, speed, pace, grade, cycling cadence, step cadence, and power, with separate sets for cycling, running, and walking where they differ. Zone sets may be added, deleted, and edited, and each set can be made the preferred one for its type.
For each zone set you can edit its Name, the lower boundary and name of each zone, and the maximum value of the set. Heart rate zone sets can be calculated automatically from your Age and Sex, and power zone sets from your Functional Threshold Power; those values are shared with Settings.
After a workout, open Workout Info and tap Analyze to view your splits, intervals, and zones.
See Zone Colors to control where zone coloring is applied.
 Email Updates
The Email Updates view controls emails that are automatically sent to your coaches, friends, and family to notify them of your route and location. Enter the email addresses of the people you want notified under Recipients, and emails will be sent when you tap the Start button, and also when you finish by tapping the Done button.
Auto Send Settings controls when messages are sent and what each one contains. You can send on Start, Stop, Start (continue), and Done; at a Time or Distance interval; and at the end of each Split or Lap / Interval. Each of these has its own list of statistics to include; a link to a map of your current location, updated every 5 minutes, is included by default and can be removed.
Prompt on Done asks before sending the final message. Include System adds device and app information, which is useful when our support team is helping you.
 Strava
The Strava view allows you to sign into Strava so that workouts are automatically posted after you tap Done in the Stopwatch view.
Connect with Strava signs you in, and Disconnect Strava signs you out. The Strava switch turns posting on and off without signing out.
Done controls whether workouts are uploaded when you tap Done. Upload Format chooses the file format sent to Strava. Stop Detection controls whether stopped portions of your path are included. Include Cyclemeter Brand adds a Cyclemeter credit to the posted activity.
The activity name and sport Strava records for each workout come from the Strava Activity and Strava Sport settings of your activity.
 MyFitnessPal
The MyFitnessPal view allows you to sign into MyFitnessPal so that workouts are automatically posted after you tap Done in the Stopwatch view.
Connect to MyFitnessPal signs you in, and Disconnect from MyFitnessPal signs you out. The MyFitnessPal switch turns posting on and off without signing out.
Done controls whether workouts are sent when you tap Done, and Done Message chooses the statistics included. Reset restores the defaults.
 About
About
Provides information about the product and us, including the version number, our privacy policy, our terms, and acknowledgements for the open source we use.
Settings
Where settings live
Cyclemeter settings are gathered in one place, but the settings you change most often are also placed where you need them.
Settings — the Settings view holds every setting, in the order listed above, with the rarely-used ones gathered under Advanced.
Workout settings — the gear button to the right of Start in the Stopwatch view opens a short list of the settings most useful before and during a workout: Stopwatch Pages and Stopwatch Settings, Heart Rate Monitor, your sharing services, Calendar and Health sync, workout Notes, Bike and Shoes, Stop Detection, Steps, Distance from Steps, Indoors, Internet Access, Zone Colors, Devices, and the Workout Explorer. All Settings at the bottom opens the full Settings view.
Activity settings — several settings can be overridden by the selected activity. See below.
Route settings — the leaderboard and official-path settings belong to each route, and may follow the app-wide value or override it. See Route Settings.
Workout Info — a few settings can be changed after the fact for a single completed workout, which causes its statistics to be recalculated. See Editing a workout.
How an activity overrides a setting
An activity can carry its own value for the settings that tend to change with what you are doing. That way a Treadmill activity measures distance from steps while everything else uses GPS, and a Mountain Bike activity selects a different bike than your commute — without you having to remember to change anything.
To set one, tap the Activity button in the upper right of the Stopwatch, tap + / Edit, tap the activity, and open Settings. You can reach the same place from the Activities view.
Each of these offers App Setting, which follows the Settings view, alongside the values that take effect whenever that activity is selected.
| Activity setting | Choices | Follows, when set to App Setting |
|---|---|---|
| Bike | App Setting, None, or a bike | Bike |
| Shoes | App Setting, None, or a pair of shoes | Shoes |
| Stop Detection | App Setting, Yes, No | Stop Detection |
| Indoors | App Setting, Yes, No | Indoors |
| Steps | App Setting, On, Off | Steps |
| Distance from Steps | App Setting, On, Off | Distance From Steps |
| Step Measure | App Setting, Automatic, Manual | Run or Walk Step Measure |
| Step Length | a length you enter | Run or Walk Step Length |
| Distance In | App Setting, Miles, Kilometers, Nautical Miles | Distance |
| Internet Access | App Setting, Yes, No | Internet Access |
Distance from Steps, Step Measure, and Step Length appear only while the activity's Steps setting is not Off, and Step Length only once Step Measure is set to something other than App Setting.
An activity's remaining settings have no app-wide counterpart — they belong to the activity alone. See Activity Features and Settings.
Heart Rate Monitor
Chooses which device records your heart rate. Only one source is used at a time:
Phone uses AirPods Pro 3 or a heart rate monitor paired in the Bluetooth section of the iPhone Settings app. This requires iOS 26 or later.
Apple Watch uses the "Record on iPhone" and "Record on Apple Watch" modes of the Cyclemeter watch app.
Cyclemeter uses a heart rate monitor you added on the Devices page.
Wait for heart rate readings to appear before starting your workout or locking your device, and force quit any other app that is using a workout session or the heart rate monitor.
This setting is also reachable from the workout settings, the Devices view, the Apple Watch view, and Health settings.
Announcements
The Announcements settings control how Cyclemeter speaks your pace, average, distance, and much more. Announcements can be heard on time or distance intervals, or on request using Siri or Remote Control. To silence an announcement in progress, click the earphone remote.
Time, Distance, On Demand, End Split, and End Interval each set an interval (where applicable) and their own list of statistics, so you control what is said and in what order.
Voice selects the voice used for text-to-speech.
Shorten speaks abbreviated phrasing, which takes less time.
Other Audio controls how announcements interact with other audio: Mix plays over it, Reduce Volume ducks it, and Interrupt Spoken Audio pauses spoken content such as podcasts.
Awaken Bluetooth Audio plays a brief tone to wake Bluetooth headphones that sleep between announcements. Choose Auto, On, or Off.
Volume sets the announcement volume relative to other audio.
Begin Split and Begin Interval announce the start of each split and interval; Begin Interval can include the Interval Name, Interval Repetition, and Interval Number.
Passing Event announces when you pass a competitor, or are passed by one.
Target announces when your performance leaves a target range. Choose Off, Short, or Long.
Start / Stop announces starts and stops. Choose Off, Remote Control (only when triggered by the earphone remote), or Always.
Half Way and Full Way announce when you reach half and all of the route's official distance.
Announcements turns all announcements off and on.
Remote Control
We now recommend use of Siri rather than Remote Control.
The Remote Control settings allow you to start and stop the Stopwatch, even when it is locked, and in your pocket, armband, or bike mount. Just slowly double-click your earphone remote (about a second apart) to stop or start.
Start / Stop enables that behavior; it is off by default.
On Demand controls whether an announcement is played on a remote click. Remote Control comes preconfigured to play an announcement when the iPhone's Music app is paused. This behavior may be changed to never play an announcement, or to silence the music and play an announcement on every click of the remote.
Note: Remote Control functions in Cyclemeter only work with the Music application, and not other audio applications such as Spotify or the Podcasts app.
Stop Detection
When Stop Detection is ON, any time that you are stopped is attributed to stopped time and not elapsed time, and will not affect your average pace or speed. Before the stop is detected, elapsed time will continue to accumulate, but is rolled back to the beginning of the detected stop. When you start moving again, time will resume being attributed to elapsed time.
After a workout is complete, you can visit the Workout Info view for that workout, tap Edit, and then change the workout's stop detection. That way, you can see distance and time and average speed or pace with or without stop detection.
You can change the settings for an Activity to force Stop Detection on or off when that activity is chosen, and you can reach the switch quickly from the workout settings.
Stop detection also affects what leaves the app: see Stop Detection in Exports in Advanced Settings, the Stop Detection setting in Strava, and the Stop Detection setting in Health settings.
Bike
Designates which bike will be selected for the next workout, and gathers the settings that apply to cycling sensors.
Tap + / Edit to add or delete a bike, and tap a bike to set its Name, Wheel Diameter or Wheel Circumference, Initial Distance, and the date it was put into service. You can see summaries of information about your bikes here, or in History.
A bike can also be selected by activities. For example your road bike can be selected by the Cycle activity and your mountain bike can be selected for the Mountain Bike activity. See the settings for each activity in the Activities view.
Default sets the wheel size used when the selected bike has none.
Speed Sensor Failover to GPS falls back to GPS for speed and distance when the speed sensor stops reporting.
Max Cadence sets an upper limit for cycling cadence values, which suppresses spurious sensor readings.
Functional Threshold Power is the maximum Normalized Power you could sustain for an hour. It drives the power calculations described in Power Meter Support, and is shared with Zones and Health settings.
Power Target Statistic chooses which power statistic your power targets are compared against.
Bike Radar controls what happens when a bike radar reports traffic: Vehicles Coming Audio and All Clear Audio play a sound, Vehicles Coming Notification and All Clear Notification post a notification (see Notifications), and Position places the radar display on the left or the right of the screen.
The simplest way for you to determine wheel size is to measure the diameter of your wheel. Use a measuring stick to measure the diameter of your tire, and enter it as the diameter in Cyclemeter.
For more information and for calculators for various rim and tire types, see ISO 5775 on Wikipedia, Tire Sizing by Sheldon Brown, or Wheel Math on bikecalc.com.
Shoes
Designates which shoes will be selected for the next workout.
Tap + / Edit to add or delete a pair, and tap a pair to set its Name, Initial Distance, and the date they were put into service. You can see summaries of information about your shoes here, or in History, and retired shoes are kept in their own section.
Shoes can also be selected by activities. See the settings for each activity in the Activities view.
Distance
Controls the units used for measuring distance and speed: Miles, Kilometers, or Nautical Miles.
An activity can use a different measure with its Distance In setting.
Weight
Your weight, used in the energy burn calculation. Choose Pounds or Kilograms, and turn on Automatically Get Weight from Health to keep it in step with iOS Health.
Age
Sex
Used in heart rate zone and energy burn calculations. Age is set by entering your birthday, so it stays current. Sex may be left unset.
Changing either value recalculates any automatic heart rate zone set.
Energy Burn
Controls whether energy is displayed as Calories or Kilojoules.
Temperature
Controls whether temperature is displayed in Fahrenheit or Celsius.
Stopwatch
Pages customizes what is shown in the Stopwatch. Use the + / Edit button to add, remove, or reorder pages. Add a page from a list of predefined configurations, or a blank page to build your own. Tap a page to rename it, to duplicate it, or to edit its individual panes, and use + / Edit again to add, remove, or reorder panes. When editing a pane, use Pane Size to control the relative proportions of the panes on that page.
The following types of panes may be included:
- Statistics – display up to 12 statistics of your choice, customized by color and text size
- Map – display a map showing either your whole route or your current position
- Graph – graph your statistics against time or distance
- Splits – display split statistics
- Laps / Intervals – display a list of the laps and intervals in your current workout
- Zones – show information categorized by speed, cadence, power, grade, or heart rate zone
- Workout – show your current interval training workout or training plan
- Progress – display your progress in an interval training workout
- Music – control the Music app, select playlists, and see what's currently playing
- Weather – show current conditions
You can choose which zone is used to color each Statistic, Graph, and Map. See Zone Colors.
Appearance sets the Stopwatch background to System, Light, or Dark.
Statistics sets the weight of statistic text to Light, Medium, or Bold.
Default Route / Navigation sets the route — and any Navigation attached to it — that will be selected after the Reset button is tapped in the Stopwatch.
Auto Select Last Activity reselects the activity you used most recently instead of the default one.
Run Shows and Walk Shows control whether running and walking display velocity as Pace (time / distance) or Speed (distance / time). This may also be changed by editing any activity.
Status Icons chooses which icons appear in the Stopwatch status area — connected sensors, sharing services, Stop Detection, Steps, Distance from Steps, Indoors, offline, Calendar, Health, Friends, the Bike Computer, and battery levels.
Map
The first section chooses the map style: Street, Satellite, Hybrid, or, with Google maps, Terrain and Traffic.
Maps chooses Apple or Google as the map vendor.
Zone Colors chooses which zone set colors your path. See Zone Colors.
Navigation shows or hides the navigation panel on the map. See Navigation.
Rotation chooses whether the map rotates to your iPhone Orientation or your Travel Direction, and Use True North orients to true rather than magnetic north.
Distance Markers and Interval Markers control whether these icons are shown on the map.
Custom Cues and Course Points control whether the cues of the Navigation you are following are drawn on the map.
Official Dashed draws the route's official path as a dashed line.
Upload Map Every 5 Minutes controls whether maps are uploaded so that your Email Updates recipients can view them. A map is uploaded whenever a Map Link is posted in Email Updates.
Share Map controls our ability to share a map with sharing services.
China GPS Correction manages the offset that occurs within China.
Draw Smooth Paths controls whether we apply smoothing to drawing of paths. Choose Auto or Off.
Graphs
The first section controls what statistics are shown in each graph. Tap + / Edit to add, remove, and reorder graphs.
For each graph you can choose the Graph statistic, whether it shows the whole workout or a Trailing time or distance, and which Zone Colors are applied. Reset restores the original set of graphs.
Smooth Elevation Graphs manages smoothing of elevation graphs.
Calendar
When Sync On Done is ON, your workout is synchronized to your iPhone Calendar when you tap the Done button in the Stopwatch view, and when a workout is edited. This is useful because the iPhone Calendar may be shared with iCal or Outlook, and with external calendars, such as Google Calendar or Microsoft Exchange. The same switch appears in the workout settings.
Calendar is the specific calendar that is synchronized with the Cyclemeter Calendar. We recommend that you create a separate calendar on the iPhone to store your workouts to more easily control sharing and display. If you are using an external calendar like Google Calendar, create the calendar there first.
Title customizes what is included in the calendar item title.
Note customizes what is included in the calendar item note.
All Day Event causes your workout to be synchronized as an all day event.
Availability is used by CalDAV and Exchange servers to indicate how the event should be treated for scheduling purposes: Busy, Free, Tentative, or Unavailable.
First Weekday allows the selection of Sunday or Monday as the beginning of the week.
Tap Sync All Now to synchronize all workouts in the Cyclemeter Calendar to the iPhone Calendar.
Tap Remove Calendar Events to remove all workouts from your iPhone's Calendar.
A single workout can be sent to your calendar at any time with Calendar Sync in Workout Info.
Notifications
Manages the notifications Cyclemeter posts during a workout, so you see your progress on the Lock Screen without opening the app.
Notifications turns them all on and off.
Time and Distance post a notification at the interval you choose.
Begin Split, End Split, Begin Interval, and End Interval post a notification at those points; End Split and End Interval let you choose what each notification contains.
Target posts a notification when your performance leaves a target range.
Bike Radar Vehicles Coming and Bike Radar All Clear post notifications from a connected bike radar. The matching sounds are set in Bike.
Reset restores the defaults.
Health
Manages what information Cyclemeter exchanges with iOS Health. If you have any issues saving this information to Health, please view Privacy in the iOS Settings app, and assure permissions are enabled for Cyclemeter.
Health turns the connection on and off.
Save on Done saves each workout to Health when you tap Done. The same switch appears in the workout settings.
Import from Health Alert offers to import workouts that Health received from another app.
Stop Detection controls whether stopped time is included in what is saved.
Ask Permission re-presents the iOS permission sheet.
Save chooses which measurements are written: Distance, Speed, Calories, Steps, Heart Rate, Cadence, Power, Functional Threshold Power, and Route.
Events chooses which workout events are written: Pause / Resume, Motion Paused / Resumed, Markers, Segments, and Laps.
Heart Rate Monitor Settings chooses the heart rate source. See Heart Rate Monitor.
Delete App Data from Health removes everything Cyclemeter has written to Health.
Competitors
Competitors allow you to compete against imported workouts, either from you or from others.
Used to browse and manage your competitors. The first competitor in the list is called Me by default, and is used for your workouts. Other competitors and their workouts are usually created during an import.
Competitors may be added or deleted by tapping + / Edit. Tap a competitor name to edit its name, initials, icons, and sharing options, and to see its history.
Rearrange Tabs
Chooses which views appear on the tab bar and in what order. Views you move off the tab bar remain available under More. See Views.
Zone Colors
Zones can color your data so that a glance tells you how hard you are working. This section chooses where that coloring is applied:
Statistics, Graphs, and Maps turn zone coloring on and off for each.
Zones opens the Zones view, where the zone sets themselves are defined.
Which zone set is used is chosen where the item is configured — in Map settings, in each graph, and in each Stopwatch pane. The Apple Watch and the Bike Computer have their own Zone Colors sections. The three switches also appear in the workout settings.
Navigation
Controls turn-by-turn guidance. See Navigation for an overview.
Navigation turns the feature on and off.
Announcements speaks each turn and custom cue as you approach it.
Alerts shows the next cue on screen when you are not looking at a view that already displays it.
Jump to Navigation lets you tap that alert to switch to the map or Stopwatch page showing the Navigation.
Rerouting finds a way back to your path when you leave it.
Simple Tracking for Navigation and Simple Tracking for Workouts announce Off course and Back on course when the path you are following has no cues to announce — an imported GPX or KML path in the first case, and an ordinary recorded workout used as a route's official path in the second.
Alerts and Jump to Navigation are set separately for your iPhone and for the Cyclemeter Bike Computer, so each can behave differently. The device's own copies live in its settings, under Bike Computer. Every other setting in this section applies to both.
Best, Median, Worst
Sets how Cyclemeter ranks the workouts of a route to pick its best, median, and worst.
Best Criteria selects the statistic used for the ranking: fastest average speed or pace, shortest or longest time, or greatest distance, ascent, calories, average heart rate, average cycling cadence, average power, power output, steps, or average step cadence.
Workouts to Include chooses All workouts on the route, or only the Most Recent ones — in which case Most Recent sets how many.
Each route may override both settings. See Route Settings.
Friends
Manages settings for Friends. See Friends.
The first section shows the account you signed in with and offers Sign Out.
Share Live Workouts controls whether your friends can follow a workout while it is in progress.
Current Workout Comments controls how your friends' comments reach you: Announce speaks them using text-to-speech, and Show on Apple Watch displays them on your watch.
Accept Invitation joins someone else's Friends list from a link.
Remove Workouts from Friends withdraws the workouts you have already shared, and Revoke Invitations cancels invitations you have sent.
Statistics chooses what your friends see — a Summary, the Workout, and the Detail statistics — and Reset restores the defaults.
Weather and Music control whether those items are shared as well.
Email Updates
Manages settings for Email Updates. See Email Updates.
Strava
Manages settings for Strava. See Strava.
MyFitnessPal
Manages settings for MyFitnessPal. See MyFitnessPal.
Barometric Altimeter
Cyclemeter supports the barometric altimeter in your iPhone to more accurately measure ascent and descent during your workout. Turn it off if you prefer elevation derived from GPS alone.
Steps
Controls whether Cyclemeter uses your iPhone accelerometer to count steps. Steps feed the Pedometer view, step cadence, and — when you ask for it — distance.
Distance From Steps
Controls whether Cyclemeter should get distance from steps rather than GPS. This is most useful for indoor or treadmill workouts. For convenience, you may set this within an activity's settings. Cyclemeter includes some default activities for indoor use, and Distance From Steps is set in these activity settings.
Run Step Length
Walk Step Length
Displays your step length for running and walking activities, and lets you enter it when the matching Step Measure is set to Manual.
Run Step Measure
Walk Step Measure
Controls whether your step length is entered manually, or is calculated automatically from your last few workouts. In the latter case, Cyclemeter uses your last few completed outdoor workouts to calculate step length from distance derived from GPS divided by the number of steps during those workouts.
An activity can override the measure and the length with its own Step Measure and Step Length settings.
Official Distance
Official Time
When you have New Route selected, then Official Distance and Official Time set values used when calculating Remaining Distance and Remaining Time in the Stopwatch, and also for Announcements and Email Updates. Change these settings to non-zero values to set distance and time goals for individual workouts for New Route.
When a route is selected, the equivalent values come from that route. See Route Settings.
Indoors
Turn on Indoors to record a workout without GPS. It is useful when you are doing one of the following indoor workouts.
- On a bike trainer without a speed sensor or heart rate monitor. In this case, you can log your workout time.
- On a bike trainer with a speed sensor. In this case, you can measure distance, speed, calories, and workout time.
- On a bike trainer with a heart rate sensor. In this case, you can calculate calories, heart rate zones, and workout time.
- On a treadmill or an indoor track, with Distance From Steps turned on either in Settings or in your Activity settings. In this case, you can measure distance, speed, calories, and workout time.
- On a treadmill or an indoor track with a heart rate monitor. In this case, you can calculate calories, heart rate zones, and workout time.
- On a treadmill or an indoor track, with a heart rate monitor and with Distance From Steps turned on. In this case, you can calculate distance, pace, heart rate, calories, heart rate zones, and workout time.
Forgot to turn off Indoor Mode for an outdoor workout? Go to the Workout Info view for that workout, tap Edit, and turn off Indoors to recover the missing GPS data.
You can also change your Activity settings to force Indoors on or off when an Activity is chosen, and Indoors Warning in Advanced Settings tells you when the two disagree.
Internet Access
Internet Access controls whether Cyclemeter may transfer data on the Internet. Turn off this setting if you want to avoid data access charges or minimize battery usage, because Map downloads, Friends live tracking and messaging, and Email Updates will not occur. Whether this setting is on or off, Cyclemeter will continue to record your time, distance, speed, elevation, and path.
An activity can override this setting.
Advanced Settings
Most Advanced settings are best left to their defaults, or changed only if Cyclemeter support staff advise you to.
Manage Subscription opens your Cyclemeter Elite subscription in the App Store. Restore Purchases restores your iPhone's record of your In App Purchases.
Screen On controls whether the display auto-locks according to your iPhone's setting (Auto-Lock), stays on (Always), or stays on only while recording (When Recording).
Import URL allows you to copy and paste in a URL to import.
GPX/TCX Import Uses Local Time Zone controls whether Cyclemeter should convert the time to the local time and time zone during import, instead of UTC time.
FIT Use Location Record for Start Time takes a FIT file's start time from its first location record rather than its file header, which corrects imports whose recorded start time is wrong.
Location Services controls whether you allow Cyclemeter to access the iPhone's GPS. This should typically be ON.
Keep Awake indicates the amount of time the GPS should remain on after your iPhone is locked, so that Remote Control keeps working.
Summarize Activities resummarizes all your workouts. Useful if you've managed your Activities settings and need to force Cyclemeter to recalculate all summaries. Typically not needed, though.
Reset Dashboards is used to reset the formats of all the dashboards found in History.
Calories from Heart Rate controls whether or not Cyclemeter uses your heart rate to measure calories.
Calories Use Elevation controls whether or not Cyclemeter uses elevation changes in calorie calculations (without heart rate).
Calories Scaling Factor multiplies the calories calculated from speed or pace. Use it to bring Cyclemeter's numbers in line with a device you trust.
Dampen Ascent / Descent controls whether Cyclemeter applies filtering to suppress small changes in elevation.
Ascent / Descent Tolerance helps increase or decrease the tolerance for changes in elevation.
VO2Max (ml/kg/min) allows you to enter your VO2Max value, which when combined with heart rate monitoring, can determine a more accurate measure of energy burn.
Indoors Warning controls whether you are warned if the indoors setting of an activity is being overridden by a global setting. Leave it on.
Poor GPS Time is a troubleshooting tool that causes the Stopwatch to show the time in which the GPS accuracy was unacceptable. It will only show such time if it is greater than zero seconds. It will also show an alert after the workout if the Poor GPS Time exceeds certain thresholds to guide you through remedies that have helped other customers.
Export Workouts allows you to export all your workouts in GPX, TCX, FIT, KML, or CSV formats, or to export for a particular time span.
Stop Detection in Exports controls whether Cyclemeter omits those parts of your workout path that occurred during Stop Detection. Useful to help get around issues with some consumers of these file formats.
Export Laps controls what is written as a lap in your export files: Intervals or Workout, Intervals or Splits, or Splits Only.
Lap on Stop, when on, causes a lap to occur when you tap Stop. This is useful to cause an interval to be recorded, which leaves a lap point on the map of the workout.
Confirm Stop asks you to confirm before the Stopwatch stops, which prevents an accidental tap from ending a workout.
GPS Error Reduction is used to control when the GPS error reduction algorithms are used. Best left to Auto.
Language and Region are useful to override the iPhone's global settings. Typically you will want Cyclemeter to use the global settings for these items.
iPad Tab Bar Position places the iPad tab bar at the top or the bottom of the screen.
News controls whether or not Cyclemeter will prompt you with news from the developers.
Support ID is a random string assigned on installation that identifies any uploads to our servers.
Support Upload will cause your workout database and application log to be uploaded to our support server. Only do so if requested by our support engineers. This information allows us to solve issues you may have encountered, and is only retained for a limited amount of time.
Supported Devices
Cyclemeter connects over Bluetooth to heart rate monitors, cycling speed and cadence sensors, power meters, and bike radar, as well as to the Cyclemeter Bike Computer. The following is a partial list of devices we support. If you have any questions about a particular device, please write to us at support@abvio.com.
Bike Radar
- Garmin Varia
- Bryton Gardia
Heart rate monitors
- Wahoo Fitness TICKR
- Wahoo TICKR FIT (arm band)
- Wahoo Fitness Blue HR
- Polar H7
- Polar H10
- Polar OH1 (arm band)
- Mio, including models Alpha, Link, Slice, and Velo (wrist band)
- Runalyzer Blue HR
- Beets BLU
- ProForm SmartBeat
- 60beat BLUE
Speed/Cadence sensors
- Wahoo Fitness RPM Speed
- Wahoo Fitness RPM Cadence
- Bontrager DuoTrap Combination Speed/Cadence Sensor (bluetooth support)
Power meters
- Favero Assioma Uno and Duo
- Stages
- Polar P1 and P2 Pedals
- Cycleops PowerTap hub power meters (with Bluetooth)
- Wahoo KICKR
Power Meter Support
If you have a bike power meter, Cyclemeter provides data that can guide your training.
During your workout, your power output may vary considerably due to hills, wind, competition, and other factors. More variability places higher stress on your body. Because of this, a simple averaging of power output is not the best measure of effort during your workout, with other metrics being more useful for understanding and guiding your training.
The metrics below are described by Dr. Andrew Coggan and Hunter Allen in their excellent book Training and Racing with a Power Meter. The terms Normalized Power™, Training Stress Score™, and Intensity Factor™ are trademarks of Peaksware, LLC.
- Normalized Power (NP) - A summary of the typical power output during your workout that takes variability into account. This is calculated by raising each power sample to the fourth power, and then taking the fourth root of the sum of these values.
- Functional Threshold Power (FTP) - Enter this number in Settings > Bike. This represents the maximum Normalized Power value you could achieve during a 60 minute ride.
- Intensity Factor (IF) - The ratio of your Normalized Power to your Functional Threshold Power. The higher this number, the harder your workout, but without taking the length of the workout into account.
- Training Stress Score (TSS) - A summary measure of the overall effort of your workout, which takes ongoing metabolic stress and the length of the workout into account. Calculated as the square of Intensity Factor multiplied by the length of the workout measured in hours multiplied by times 100.
- Variability Index (VI) - The ratio of the Normalized Power and the Average Power of the workout.
- Max NP - The maximum Normalized Power achieved during specified time periods of your workout. For example, Max NP (5:00) is the maximum Normalized Power achieved during any 5 minute time period during your workout.
Barometric Altimeter
Cyclemeter supports the barometric altimeter in your iPhone to more accurately measure ascent and descent during your workout. This may be turned off in Settings.
Heart Rate Sources
Cyclemeter can record heart rate from an Apple Watch, from AirPods Pro 3 or another monitor paired in the iPhone's own Bluetooth settings (iOS 26 or later), or from a monitor you add on the Devices page. Choose which one is used in Heart Rate Monitor settings.
Troubleshooting
Cyclemeter uses the iPhone's internal GPS to determine your location over time. While Cyclemeter employs advanced technology to filter out bad data, it is still dependent on the quality of the location data reported by the iPhone.
Symptoms that Cyclemeter has received bad data from the iPhone include:
- Incorrect distance, elevation, climb, or calories
- Incorrect average pace or speed
- Excessive fastest pace or speed
- Spikes in the graphs
- Path deviations in the map
The following suggestions have worked for many of our customers.
Check that Location Services is Enabled - Using the Settings application on your iPhone, tap Privacy, then Location Services, and check that these are enabled for Cyclemeter.
Restart Your iPhone if GPS Reception is Consistently Poor - When iPhone GPS reception is consistently poor, try completely shutting down the iPhone and then restarting. To do so, hold down the side button on the iPhone and then Slide to Power Off. Wait until the iPhone is completely powered off. Then turn on the iPhone by holding down the side button until the iPhone starts.
Use Our Latest Software - Make sure you're using our latest software. We are constantly improving our software and making it better able to handle GPS inaccuracies.
Wait for Good GPS Reception Before Starting - After launching Cyclemeter, wait several seconds for the iPhone GPS to warm up and report good GPS reception. If Cyclemeter displays the Poor GPS Reception alert, please wait until the GPS status in the lower left of the Stopwatch shows 3 bars or more.
GPS Reception Is Poor Indoors - GPS reception is usually unacceptable indoors, because steel, wood, or concrete may be in the way of locking onto satellites.
GPS Reception May Seem Acceptable in the iPhone Maps App - Cyclemeter requires sufficient GPS accuracy to track your activity, while the Maps app requires less to determine your general location. If you look closely at the Maps app display, you may see a large blue circle around your location indicating poor accuracy. When GPS accuracy is low, the iPhone uses Wi-Fi and cell phone tower location sensing to determine your general location, which is not accurate enough for tracking your workouts.
How You Carry Your iPhone Can Affect GPS Reception - The iPhone needs to see at least 3 of the 24 GPS satellites circling the earth to get a lock on your position. Your body absorbs some of the signal. Most people keep their phone in a pocket, an armband, or in the back pocket of a jersey. Try not to have the iPhone near metal, such as a metal zipper or bike tools.
Tall Buildings and Trees Affect GPS Reception - Tall buildings, trees, terrain, mountains, walls or cliffs, etc. can reduce GPS reception.
Radio Frequency Interference (RFI) Can Affect GPS Reception - RFI may interfere with GPS reception. Typical sources of intense RFI include microwave antennas, satellite dishes and especially power lines.
Monitor Poor GPS Time - Cyclemeter will report the time that GPS reception was unacceptable in red next to the GPS indicator in the Stopwatch, and show an alert when tapping Done after a workout. To turn this off or adjust the value at which it occurs, see Poor GPS Time in Advanced Settings.
Turn Off Wi-Fi - When the iPhone cannot obtain acceptable location information from the GPS because of poor GPS reception, the iPhone will instead rely on less accurate information from a nearby Wi-Fi hotspot or cell phone tower location. That in turn may lead to an inaccurate determination of your location and poor results. One possible remedy is to turn off Wi-Fi during your activity, which also conserves battery power.
Use iPhone Within Acceptable Operating Temperatures - Apple has published the acceptable operating temperatures for the iPhone. Outside of those temperatures, the iPhone GPS may report erroneous or inaccurate location information to Cyclemeter.
Edit Your Statistics - Even if you follow all of the guidelines we've outlined, from time to time GPS reception issues may cause Cyclemeter to record erroneous results. Cyclemeter allows you to edit the statistics on your activity such as the distance, time, climb, calories, etc. Feel free to edit your statistics after your workout. See Editing a workout.
Lock Your iPhone - Before you put your iPhone into your pocket, be sure to press the side button. This locks the iPhone, but Cyclemeter will continue to record data. This also reduces battery usage by powering down the display. Note that you can use Siri to start and stop Cyclemeter while it is in your pocket and locked.
Cyclemeter Must Be Running to Record Data - Make sure that Cyclemeter runs continuously during your workout. If you answer a phone call, reply to a text, or use the Music application to change music, just be sure to run Cyclemeter again when you are done. Some of our customers have reported a habit of pressing the home button before putting their phone into their pocket, which is something to avoid.
Cyclemeter Requires GPS Capabilities - The iPod touch and some iPad models do not have GPS capabilities. While they can generally determine their location, this is through the use of cell phone towers or wi-fi locations, which are not reliable or accurate enough.
We Are Happy To Help - Visit cyclemeter.com/support for information about how to contact us, and we will be happy to answer any question or help with any issue.
Thanks for being our customer!
The Abvio Team